WebApps: A Simple Windowed Application

Task
Create a window that has:
- a label that says "There have been no clicks yet"
- a button that says "click me".
Upon clicking the button with the mouse, the label should change and show the number of times the button has been clicked.
I guess this task can be considered as a kind of minimal example of an interactive component. In the first step, we will build up the application as shown in the Web Application Tutorial. After that, we will modify it a little bit in order to convert it into a directly executable file.
In the end, it will look like this:
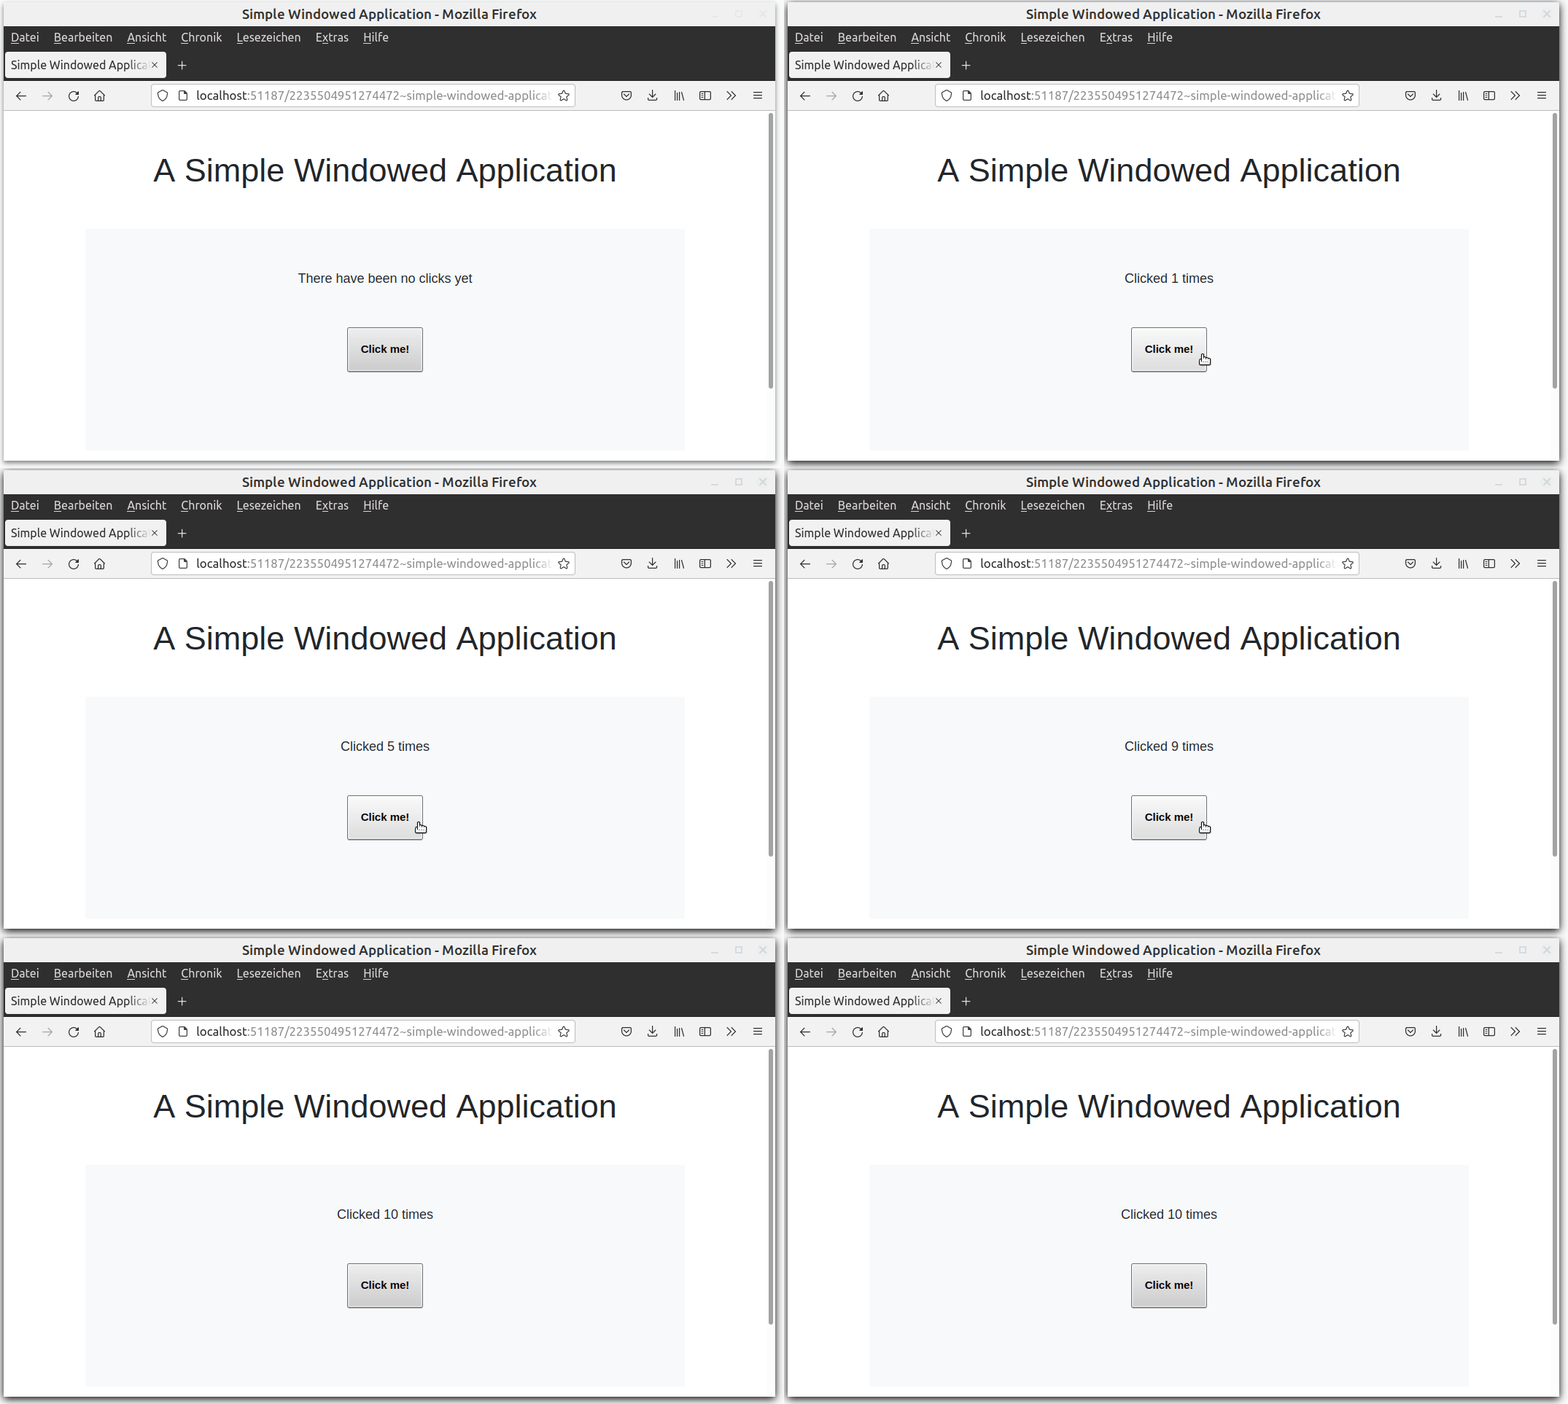
You can view the hosted version here.
Preparations
As first step, let's start the application server from the terminal with the needed libraries:
$ pil @lib/http.l @lib/xhtml.l @lib/form.l --server 8080 +
Then let's define the basics in a file called simple-windowed-application.l:
- CSS file (I use this bootstrap css file),
(app)andactionfunctionshtmlfunction
(setq *Css '("@lib.css" "css/bootstrap.css"))
(app)

(action
   (html 0 "Simple Windowed Application" *Css NIL
      (form NIL) ) )
If you point the browser towards http://localhost:8080/simple-windowed-application.l, you should now see a blank browser tab with the title "Simple Windowed Application".
Define the GUI elements
According to the task description, we need a label that says "There have been no clicks yet", and a button saying "click me".
Instead of a label, let's use a +TextField as it's more flexible because we can use our prefix classes. A +TextField without any arguments is simply plain HTML text. In this case, the text needs to be defined by a prefix class, for example +Init:
(gui '(+Init +TextField) "There have been no clicks yet")
(gui '(+Button) "Click me!")
So far so good - now it looks like this:

Define the counter
When the button is clicked, a counter should increase. Let's use a global variable *Count for that. If it doesn't exist, it should be created with a default value of 0, which can be done using the default function.
(default *Count 0)
We shouldn't define the *Count by something like (setq *Count 0), because in this case *Count would be set to 0 everytime the page reloads.
Now let's update our button by adding a function. Each time the button gets pressed, *Count should increase. In order to see the output, let's try to print it into a <p> tag:
(gui '(+Button) "click me" '(inc '*Count))
(<p> NIL (prinl *Count))
Now everytime the button is clicked, the page reloads and an incremented value of *Count is displayed.

So far, so good - however, our task was to update the label field, not create a new one!
Using the set> method
We know that every GUI-object has a set> method. The syntax for method calls on objects is (<method> <object> <arguments>).
How we can find our +TextField object? The easiest way is by relative position referencing: The text field is -1 fields relative to our button position. So let's update the button function accordingly and remove our <p> function:
(gui '(+Button) "click me" '(set> (field -1) (inc '*Count)))
It's not beautiful, but it works:

We can also remove the flicker caused by reloading the page if we add the prefix class +JS to our button. In this case, the function is executed without reloading the other DOM elements.
Beautify
Now let's make it a little bit more beautiful. We can use the Bootstrap grid system and positioning classes. For example, <div> "row" and <div> "col" can be used to create the responsive grid, whilejustify-content-center centers each cell and text-center centers the element within the grid.
Furthermore, our counter is not very intuitive. At the moment it just counts up and for every number larger than 1, there is a + sign. Let's modify the button function to return a string.
We can create a string out of a number of various input types with the pack function, for example like this:
(pack "Clicked " (inc '*Count) " times")
Finally, it looks like this:
Make the file executable
We're almost done, but it's not so beautiful that we need to start the server and load the libraries in a separate process. Let's create a single executable file.
As first step, we need to set the library and interpreter as first line of the script (here you can learn why). Also, we should load the libraries directly into the file. In order to start it as standalone-script, we also need the @ext.l file. These are the first two lines:
#! /usr/bin/picolisp /usr/lib/picolisp/lib.l
(load "@ext.l" "@lib/http.l" "@lib/xhtml.l" "@lib/form.l")
How can we start the server from within the script? From the documentation we learn that a PicoLisp function is recognized by the server function if it starts with !. Also, a non-debug production server will be started with (wait).
So let's define a function start that contains all the page logic, which is everything except the definition of the global variables and path definitions, because these only need to be loaded once. This means that we can also remove the ifn *Count-condition.
(zero *Count)

(de start ()
   (app)
   (action)
       (html ...
Then we call the start function from server:
(server 8080 "!start")
(wait)
As very last step, let's make the file executable by chmod +x simple-windowed-application.l and execute it:
$ chmod +x simple-windowed-application.l
$ ./simple-windowed-application.l
Now you should be able to see it on http://localhost:8080.
Finished! You can download the source code of this example here and the executable version here.
Sources
https://rosettacode.org/wiki/Simple_windowed_application#PicoLisp
https://getbootstrap.com
Comments
Join the discussionNo comments yet. Be the first to comment.
Algorithm Classics from the Rosetta Code
Sometimes an example says more than 1000 pages of documentation. This series will take specific algorithmns and discuss their implementation in PicoLisp step by step. https://rosettacode.org/