Welcome back to the Web Application tutorial. Today we will discuss how the PicoLisp interpreter actually transforms a script to something the browser can display.
In order to understand that, we will need some basic knowledge about the HTTP protocol as well. Let's get started!
What does the browser expect?
As already mentioned in our previous post, a web browser doesn't know any PicoLisp (of course). So we need a way to translate our PicoLisp code to the browser-understandable format XHTML. As first step, let's try to understand what is actually happening when we open a web application (for example, a website).
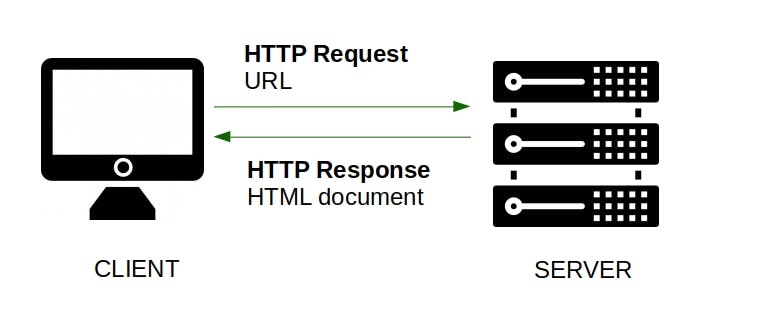
First, we need to tell our browser (the "client") which page we want to visit. The client then asks the PicoLisp server to send a response with the data to be displayed. What the client receives, is a header with some meta data, plus the actual HTML document.

In a normal webbrowser this is all transparent for the user - we only see the rendered page. So, just for fun, let's make it visible by calling the page using the command line tool curl. We are also interested in the headers, so let's add the -i flag.
$ curl -i https://picolisp.com/wiki/?community

HTTP/1.1 200 OK
Server: PicoLisp
Date: Thu, 23 Sep 2021 09:02:14 GMT
Content-Type: text/html; charset=utf-8
Transfer-Encoding: chunked

<!DOCTYPE html>
<html lang="en">
<head>
<meta name="viewport" content="width=device-width"/>
<title>PicoLisp Wiki: community</title>
<base href="https://picolisp.com/wiki/"/>
<link rel="stylesheet" type="text/css" href="https://fonts.googleapis.com/css?family=Share+Tech+Mono"/>
  [.......]
<link rel="stylesheet" type="text/css" href="https://picolisp.com/wiki/wiki/wiki.css"/>
<script type="text/javascript" src="https://picolisp.com/wiki/@lib/form.js"></script>
</head>
<body>
<script type="text/javascript">onload=ping(7)</script>
  [.......]
</body>
</html>
The $ stands for a command that is executed in the terminal. It does not need to be typed.
Here we can see what the browser expects from the server. Basically we have two parts: the header and the HTML document. Let's look at both of them.
The Header
The header contains all relevant meta-information, for example if the request was successful (status code 200 OK), and what kind of document is being sent (Content-Type: xhtml; charset=utf-8). Some other things the header commonly includes are for example cookies, the previously visited page (referrer), and many more.
In our example, it's only these 5 lines:
HTTP/1.1 200 OK
Server: PicoLisp
Date: Thu, 23 Sep 2021 09:02:14 GMT
Content-Type: text/html; charset=utf-8
Transfer-Encoding: chunked
The HTML document
Below the header you can find the actual HTML document, starting with the <!DOCTYPE HTML> declaration. The actual content is wrapped in <html> tags and contains the information you typically expect, like <head>, <title> and so on.
The HTML response contains the actual content to be displayed. A minimum valid response has the following structure:
<!DOCTYPE HTML>
<html>
  <head>
    <title>Here comes the title</title>
  </head>
  <body>
   Here comes the body
  </body>
</html>
Now back to PicoLisp!
Now that we know what the browser expects, let's have a look at a minimum example.
The first thing we need is to start the REPL with pil + and include two libraries, xhtml.l and http.l.
$ pil +
: (load "@lib/xhtml.l" "@lib/http.l")
-> http404
Among other things, the xhtml.l-library contains the html function which we will need for our first explorations. The http.l library contains the functions that will create the header for us.
Now let's copy the "hello world" example from the PicoLisp documentation into the REPL and see what happens:
: (html 0 "Hello" NIL NIL "Hello World!")
The output we get is:
HTTP/1.0 200 OK
Server: PicoLisp
Date: Thu, 23 Sep 2021 09:55:34 GMT
Cache-Control: max-age=0
Cache-Control: private, no-store, no-cache
Content-Type: text/html; charset=utf-8

<!DOCTYPE html>
<html lang="en">
<head>
<meta name="viewport" content="width=device-width"/>
<title>Hello</title>
</head>
<body>
Hello World!</body>
</html>
We see a response header on server "PicoLisp" with the title "Hello" and the text "Hello World" in its body.
This means, the html function simply transforms its arguments into a complete HTTP-Response including headers and content.
The html function
Let's have a quick look at the arguments of the html-function. We can check the source code of the html-function by typing vi 'html in the REPL:
: (vi 'html)
It opens the vip, a subset of the vi-editor. We just want to have a look at the arguments:
### XHTML output ###
(de html (Upd Ttl Css ATTR . Prg)
       ....
You can exit the vip with :q. For further information read here.
As you can see, the html function takes five arguments: Upd, Ttl, Css, ATTR and Prg. Let's go through them.
: (html 0 "Hello" NIL NIL "Hello World!")
Upd: A max-age value for cache-control (in seconds, zero means "no-cache"). You might pass a higher value for pages that change seldom, orNILfor no cache-control at all.
In our case, we used 0, which results in the Cache-Control: max-age=0 line of the header.
Ttl: The page title.
We used "Hello" as second argument, and get <title>Hello</title> in the HTML part of the response.
Css: A CSS-File name. PassNILif you do not want to use any CSS-File, or a list of file names if you want to give more than one CSS-File.
In our case we used NIL, because we don't need CSS for our basic example.
ATTR: A CSS style attribute specification. It will be passed to the body tag.
Here we passed NIL as well because we don't use any CSS yet. We will come back to that point later.
Prg: An arbitrary number of expressions, which form the body of the resulting page.
Here we passed "Hello World" and received <body>Hello World!</body>.
Wrap-up
In short, the html function creates a fully valid HTTP-response by creating the header and content out of the arguments passed on to it. Now we should have a basic understanding of how the PicoLisp interpreter is able to transform a PicoLisp-script into a HTTP response.
In the next post, we will set up a server and display a minimal "Hello World"-example.

