


In the last posts, we have seen how we can access the Java API from PicoLisp, and how a PicoLisp app looks like in general.
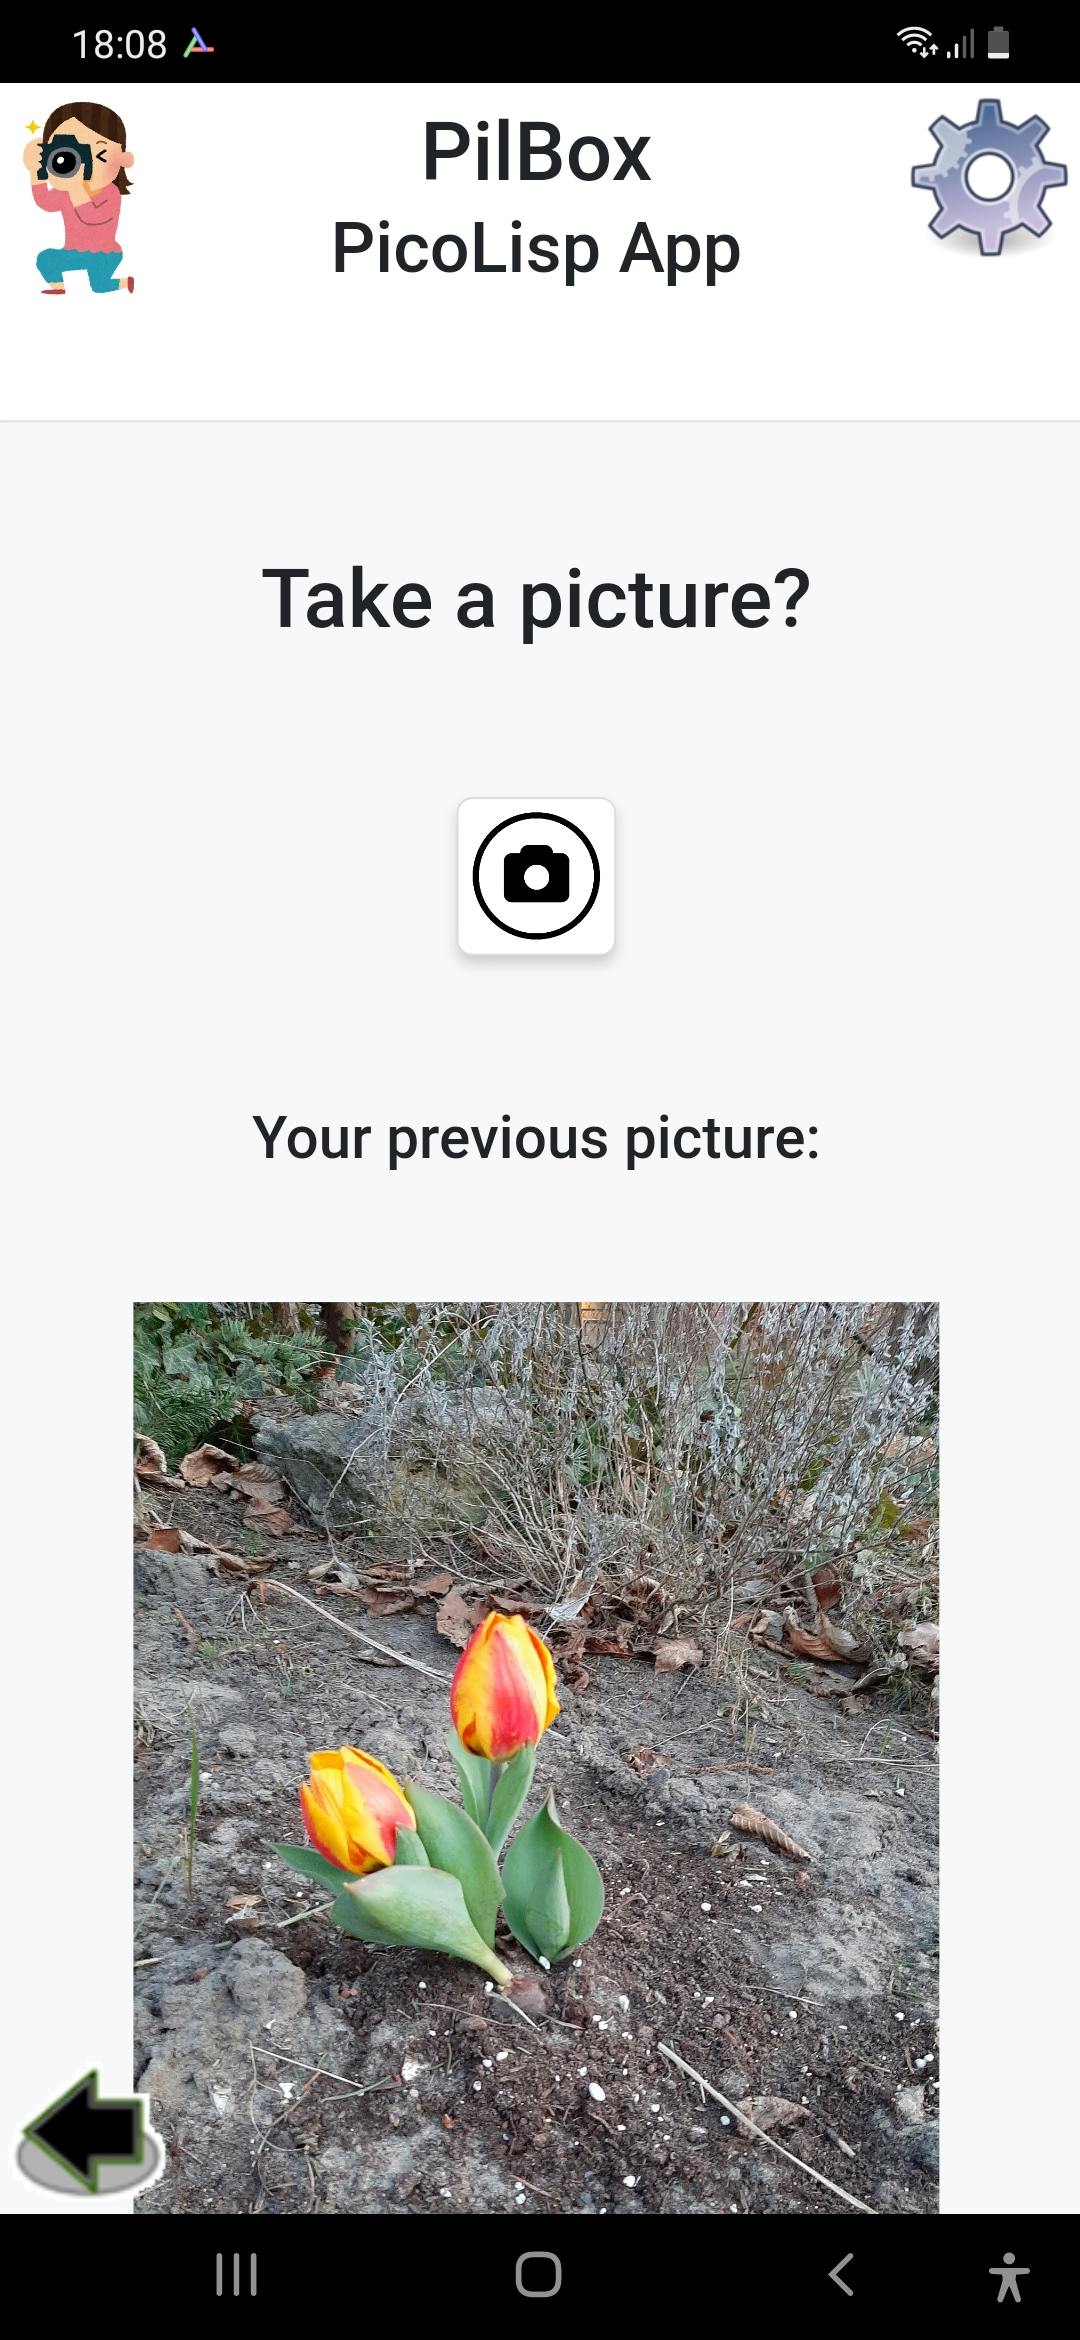
Now I would like to start a little series of small independent "Apps". We will start with a little "Camera" app. The functionality is extremely simple: We can take a picture and save it to the app's local storage. If we take another picture, the old one is overwritten.
Check Camera Availability
First of all, we should investigate how we can address the smartphone camera from within our app. For a little inspiration, let's check the camera.l file in the demo app.
The permissions flow as defined in the android developer tools is as follows:
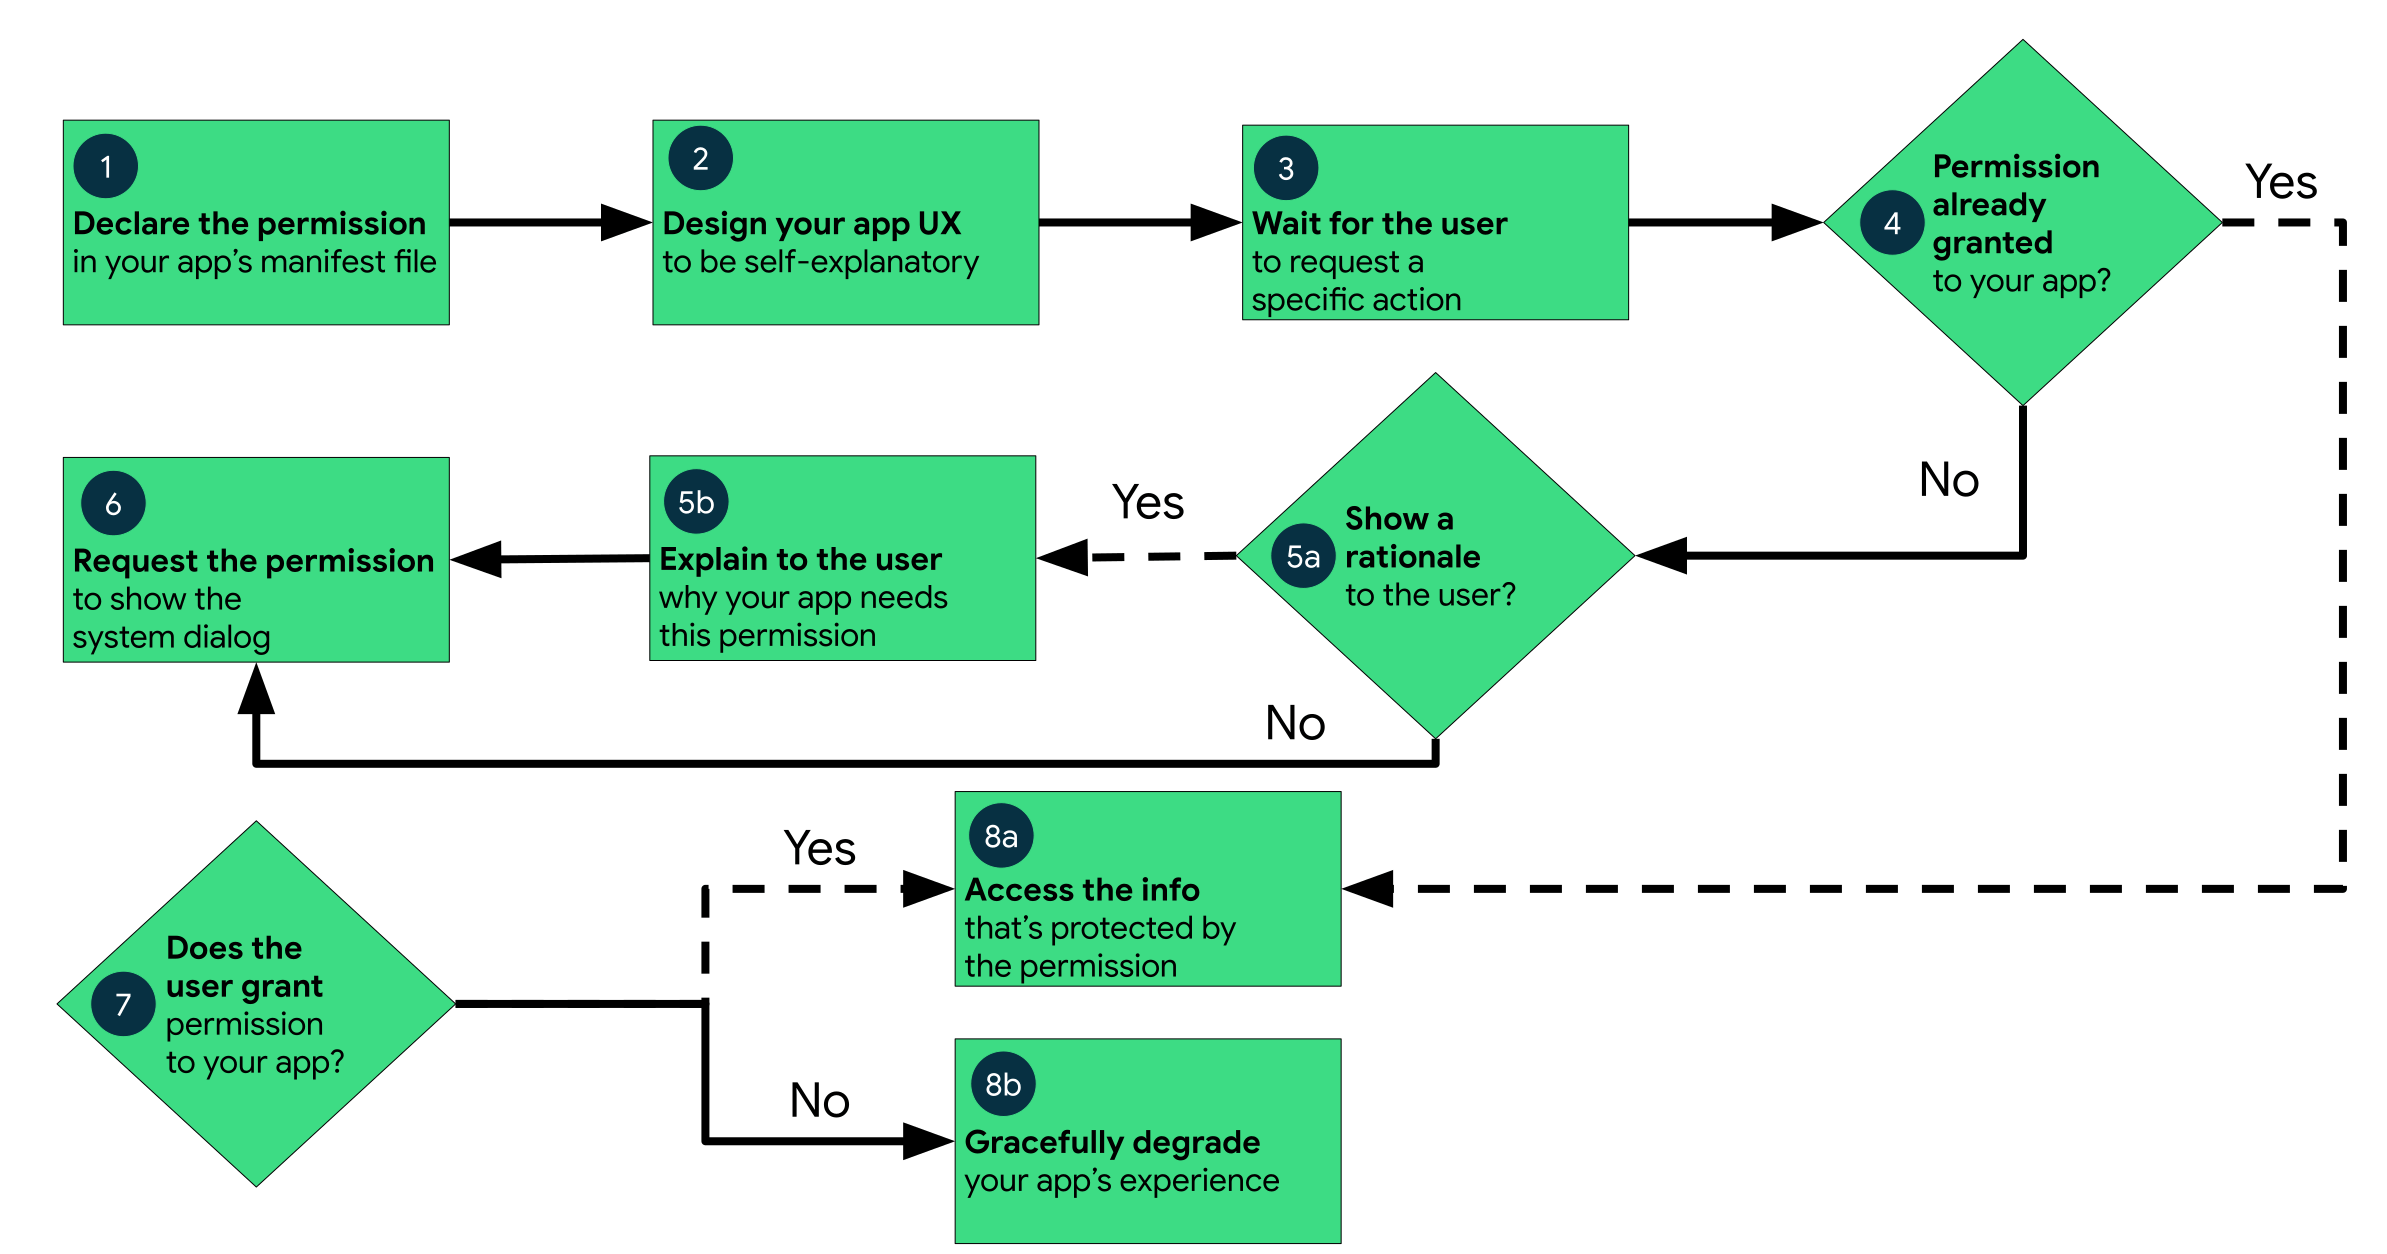
Step 1 (declaring the permission in the app's manifest file) is already done by the PilBox APK. Let's focus on the flow from step 3 to step 6: Checking for available permissions and ask for setting them.
We can test if the camera is enabled with the (camera?) function. It checks if the camera is available for the smartphone and if the camera permission is set. If permission is not available, the permit function asks for permission by launching the typical Android pop-up:

Let's create an App.l in our new app and put the following code inside:
(menu "Camera"
   (form NIL
      (gui '(+Able +Button) '(camera?) "Take Picture")
This will simply render a button that is enabled if the camera permission is already set. Otherwise, permission will be requested for the user.
Optional: Check the sources
Theoretically, it is enough for us to know that camera? does what we want: Check permissions and get them if needed.
However, I think it's worth to also study the PilBox source code to see how this exactly maps to the classes and methods on https://developer.android.com.
camera? checks if the camera is available for the smartphone and whether the camera permission is set. Otherwise, the function returns NIL. You can find it in line 286 in assets/run/lib/android.l.
(de camera? ()
   (and
      (java (java CONTEXT 'getPackageManager) 'hasSystemFeature "android.hardware.camera")
      (permit "android.permission.CAMERA") ) )
The and condition checks two things: First, whether the smartphone actually has a camera, and secondly, if the permissions are enabled. If not, the permit function asks for permission. How does it work?
As explained in the post Intents and the Java Interface, the first condition of camera? maps directly to the Java method
getPackageManager().hasSystemFeature("android.hardware.camera")
The second condition calls the permit function which is defined in line 123 of assets/run/android.l. It connects two steps with an or clause:
- Has the permission already been granted?
- If not, ask the user for permission and return the result.
The permission check is realized by the ContextCompat.checkSelfPermission() method, while the actual permission request is done by ActivityCompat.RequestPermission().
Called from PicoLisp:
(de permit (Str)
   (or
      (=0
         (java  "android.support.v4.content.ContextCompat"
            'checkSelfPermission
            (; CONTEXT GUI)
            Str ) )
      (java  "android.support.v4.app.ActivityCompat"
         'requestPermissions
         (; CONTEXT GUI)
         (list Str)
         0 ) ) )
where Str is the relevant permission, in our case "android.permission.CAMERA".
Taking a picture and storing it
Now let's assume the user has given permission to use the camera. Next, we want to take a picture and store it. For this purpose, we can use the pre-defined function takePicture, which takes a destination and a function as arguments.
In our case, let's store the picture in the tmp-folder of our app and reload the page. The tmp folder is automatically deleted at the end of the PilBox process.
'(takePicture (tmp "img.jpg")
   '((Intent)
      (loadUrl (baseHRef) *SesId "miasCamera/App.l") ) )
The tmp function creates a folder in .pil/tmp/<*Pid>/, where *Pid is the current process ID. With this, we create a "take picture" intent for the native camera function. The return value of the intent, is the input value for our anonymous function '((Intent). Strictly speaking, it is not needed because we don't use the intent's return value; instead we simply reload the page. But it helps to illustrate that we are working with an intent here.
Of course, we don't only want to have the picture in our tmp folder, but we want to display it in our app and keep it even if the app is restarted. So let's copy the temporary file to our local app folder and display it:
(gui '(+Able +Button) '(camera?) "Take picture"
   '(takePicture (tmp "img.jpg")
      '((Intent)
         (call "cp" (tmp "img.jpg") "miasCamera/img/img.jpg")
         (loadUrl (baseHRef) *SesId "miasCamera/App.l") ) ) )
(gui '(+Var +Img) "miasCamera/img/img.jpg")
With this, we have fulfilled the minimum requirements of our basic app: Asking for camera, taking a picture and displaying it. It is not very usuable yet, so this point will be discussed in the next post.
Deploying the app
How can we get our app now onto our smartphone? There are two ways:
1. Create a zip-File, saving it to the phone and opening it with PiLBox.
This approach works very well with finished apps, but is not so helpful for development, because you end up zipping and transferring all files for each minor change.
2. Get a pseudoterminal on your phone via WiFi and edit the files directly.
This approach has been explained in this post: Getting a shell to your PC. After setting it up as described in the post, you connect to your phone with
~/pil21/pil @/bin/pty <smartphone-IP-address>
(assuming that pil21 is installed in your home folder, otherwise replace the path).
Then you can either modify the source code directly with the vi-based PicoLisp editor vip, or you can edit the files locally and push them with pbPut <folder>/<file>. Note that in this case, the folder structure needs to be the same locally and on your phone.
: (pbPut "miasCamera/App.l")
This allows you to modify the app instantly.
In the next post, we will improve the app's look & feel, as it is barely usable at this point.
The source code of the example up to here can be found here, the zip-File here.